21 September 2016

Validation Process v2

Created Support Process

adding new statuses per request
Status:
- Pending
- assigned
- awaiting approval (teri, shep, ariana)
   -- approved
   --denied
   --invalid registration

create record type for validation

added new case origin - validation - made it the only option for validation case record types
added reasons - validation, reinspection - separate reasons

validation queue - already exists

created approval notification email template

Approval Process

New Approval Process Steps

Step 2. Specify entry Criteria 

case reason = Validation

Step 3. specify Approver field and Record Editability Properties

Case Owner must be person requesting approval - Approval request will go to their manager
make sure everyone's user settings has their manager - done via dataloader

Step 4. Select Notification Templates

'approval process request notification' template

Step 5. Select Fields to Display on Approval Page Layout

Done

Step 6. Specify Initial Submitters

Case owners and the Validation team

Specify whether a record must meet certain criteria before entering this approval step. If these criteria are not met, the approval process can skip to the next step, if one exists. Learn more

Step 3. Select Assigned Approver

all submissions go to Teri.  no delegated approver


To assign delegates, for each user, populate the Delegated Approver field on the user’s detail page.

if approval declined then close case automatically - no (manually update status to Need more info or Closed Rejected
     Closed - Rejected created this status
    removed normal Closed status from validation record type 

need - rejected, close done   AND  rejected, need more info  Need More Info created 
when approved - auto close  ,  closed - good/! - can't 
   created Field Update from Setup - Update Status to Need More Info.  Use in first rejection in the process.
Updated Validation Queue - all of that record type not closed.

test - if Teri accesses validation case owned by Sharon can teri submit then approve the case?  yes
customer support should only see customer support cases - updated the Validation Queue so they can't access 
need to update the profiles to not see those cases too done

validation role should only see validation and aging cases - done with profiles
test if Dee can edit or see aging and/or validation cases - nope

case creation - contact name required
done  
AND
(Contact.Id = "" ,
RecordTypeId = "012630000000JKC")

cant' close until approval done

on case page layout: make Description field prominent
Create a new page layout for validation cases
update the page layout assignements


create Follow Up button that creates a new task.  button near Edit button on case layout
validation.support@confirmation.com needs to be an email-to-case address forwarded to salesforce.  this need approval from Shep.   no customer reply notification necessary. 
Validation Cases can only be viewed by Validation Team and UP. 


create case origin - Self Registered 

make sure sharon/validation team can email from the validation email address. 

only teri to close validation cases
AND(
OR(
ISPICKVAL( Status , "Closed")
,ISPICKVAL( Status , "Auto Closure - Aging Days Under 5")
,ISPICKVAL( Status , "Closed - Validated")
,ISPICKVAL( Status , "Closed - Rejected")
),
RecordTypeId = "012630000000JKC",
NOT($User.Id = "005A00000024Z8O"))




20 September 2016

Creating a New Case Process - Aging Confirmations


#1 Create the new Support Process


Titled it Aging Confirmations - Case creation and management process for accounts with aging confirmations. 


Used Current Status values of Open and Closed only
Updated additional settings for the Aging record type; case origin, case reason, priority, training issues, type

Added Case Origin - Aging Case Import
Associated this origin with the record type, Aging

Updated the record type, Aging, origin list to only have Aging Case Import available and marked as default. 

Created a new support process, Customer Support.  

Created new record type, Customer Support.  Assigned the new Customer Support support process to the new Customer Support record type.  Made this available for all Profiles. 

Updated the Layouts for customer support record type just for the customer support profile and admin profile. 

Case Origin : removed Aging
Case Reason : removed Aging
no other changes

Created fake CS email-to-case address. 

Added Case Record Type to the Page Layouts

Ensure each profile has appropriately assigned record types.  Sales will need to see Aging case record types.   Ensure the button master record type is 'customer support'

Add descriptions to the record types.

create process that 'completes' all aging record type cases when the case is closed.   closed normal or closed auto

assignment rules - if origin is 'aging case import' then do not reassign owner
alert aging public group of new email on aging case

Aging Case Process
Access an Account and notice the field 'Oldest Aging (Days)'.  This field will be part of the automatic data feed process from Confirmation.com.
This field is the controlling field in a formula field titled 'Has Aging Confirmation(s)'.  When the 'Oldest Aging (Days)' (OAD) field is null or 0 through 4 then 'Has Aging Confirmation(s) (HAC) is unchecked.  When OAD is greater than 4 then HAC is checked.  

Try changing the OAD field on account pages and see that cases and tasks are created and closed automatically.   Also, add contacts to those accounts with email addresses and last login dates populated, use your own email so you see the emails sent to customers.  Notice how the contact with the most recent login is the one who gets the email. 


Under the hood…

There is a process that runs in the background based on the HAC checkbox. 

When the HAC field on an Account goes from checked to unchecked any Aging Cases associated with that Account are marked 'Auto Closure - Aging Days Under 5' as the Status.  This is a Closed Status.  All of the Tasks associated with these Cases (should only ever be one open at a time) will be marked Complete and removed from the daily task items on the Home page.

When the HAC on an Account changes from unchecked to checked, meaning the account now has a confirmation pending over 5 days, a Workflow is triggered.  


The Workflow uses the account ID and searches for all of the Contacts linked to that ID finding the Contact with the most recent login to Confirmation.com (also fed automatically via the data feed from Confirmation.com).  Then an Aging Case is created using the Account ID and Contact ID to populate the case's related records.   The Status is set to 'Open', the Owner is 'Aging Case Queue' and the Case Origin is set to 'Aging Case Import'. 


A Task is also created and the due date is scheduled for Three Days After the Case Creation Date.  This Task is assigned to Teri. 

Here's a list of steps the Sales Team, Teri and I discussed to manage the tasks on these cases. 
1. Aging rep completes original automated task by reaching out to the contact on the case. 
2. Aging rep can continue to update that task or complete that and create new tasks, assigned to themselves, for any follow up.  
3. When it's time to escalate to the sales team the aging rep will create a task assigned to the owner of the account (sales rep) and set the due date. 
4. Sales will work on the task and update the aging team with another tasks to complete any additional actions. 

In summary:
Aging Rep
1. From Home Page, complete daily Tasks
2. When needed, assign Task to Sales Rep

Sales
1. From Home Page, complete daily Tasks
2. When needed, assign Task to Aging Rep


Audit Trail
Created record type: Aging
Added value Aging Case Import to Case Origin picklist with color Assigned dynamically
Created record type: Customer Support
Changed Cases page layout Feed Case Layout
Created flow with Name "Aging Case Creation" and Unique Name "Aging_Case_Creation"
Created custom formula field: Oldest Aging (Days) (Number)
Created custom formula field: Has Aging Confirmation(s) (Checkbox)
Added value Auto Closure - Aging Days Under 5 to Case Status picklist with color Assigned dynamically
Changed Case Status picklist value from Auto Closure - Aging Days Under 5 to Auto Closure - Aging Days Under 5 (Closed)
Created workflow rule Aging_Confirmations3016300000011ND for Object: Account
Created Flow Trigger Aging_Confirmations3016300000011ND for Object: Account
Activated flow version #2 "Mark Case Closed" for flow with Unique Name "Mark_Case_Closed"
Created Email Alert Alert to Customer of Aging Confirmation for Object: Contact
Changed Default Workflow User to Shepley Smith
Changed email for user Shepley Smith from shepley.smith=confirmation.com@example.com to capconsupp@gmail.com
Created Email Alert Aging Confirmation Alert to Customer for Object: Case
Changed Case Assignment Rule Support Email Routing
Created Task please follow up on aging email for Object: Case
Activated workflow rule run task on aging case creation for Object: Case
Created Queue Aging Cases
Changed membership for Queue Aging Cases
Activated flow version #10 "Aging Case Creation" for flow with Unique Name "Aging_Case_Creation"
Created Public Group Aging Case Group_Creation"
Created Email Alert Email Aging Rep when customer replies to aging case for Object: Case
Created workflow rule Customer replied to aging case for Object: Case
Activated flow version #11 "Aging Confirmations" for flow with Unique Name "Aging_Confirmations"

04 August 2016

Lead Training


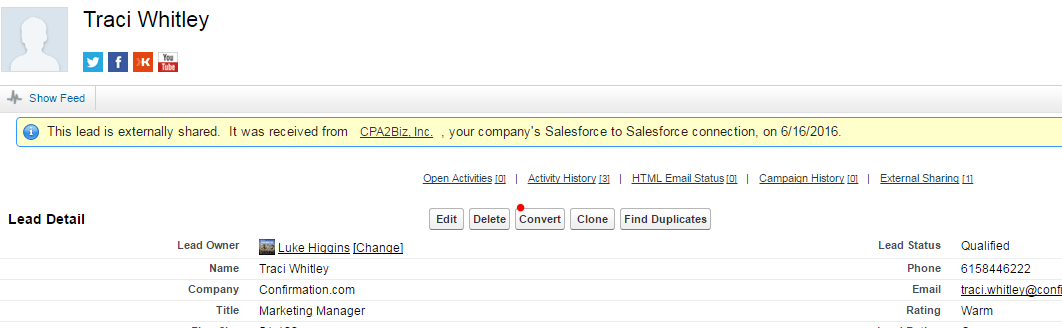
  1. How the leads come in to Salesforce
    1. CPA.com activity
    2. Hubspot 
  2. Access the Leads tab
    1. In Lightning
    2. Lightning Lead Tab
    3. In Classic
    4. Classic Lead Tab
  3. Select Your Desired List View
  4. Lightning My Open Leads List View

    Notice the Lead Status in the My Open Leads list view below.
    My Open Lead Status Filter

  1. Lead Status
    1. Open - Default Status for new leads
    2. Contacted - Manually update to this status as you reach out to the lead
    3. Qualified - When you're ready to move the lead to a Contact and Account (and optional Opportunity)
    4. Unqualified - Lead is not interested.  No need to convert to a contact. 
  2. Lead Conversion

    1. When a lead is qualified it's ready to be Converted

1. Click the Convert button in classic or lightning. (This can be done prior to moving to the Qualified status)

Convert in Classic


Convert in Lightning


2. Convert the Lead by filling in the proper fields.  Creating an Opportunity is optional.


01 August 2016

Web to Case rollout

  1. From Setup, enter Web-to-Case in the Quick Find box, then select Web-to-Case.
  2. Select 

Enable Web-to-Case.


  1. Choose a default case origin.
  2. Select a default response template for automatically notifying customers that their case was created.
    If you set up response rules to use different email templates based on the information submitted, the default email template is used when no response rules apply. Leave this option blank if you do not wish to send emails when no response rules apply. This template must be marked as “Available for Use.”
  3. Select Hide Record Information to hide the record information in the email sent to customers if the case creation fails.
  4. Enter an email signature if you’d like to use a different signature than the default.
  5. Click Save.


  • Create custom case fields, if needed.
  • Create a default email template for the automated notification that will be sent to your customers when they submit a case.
  • Create case queues if you wish to assign incoming cases to queues as well as to individual users.
  • Customize Support settings to select the default owner of cases that don’t meet the criteria in your assignment rule.
  • Create an active case assignment rule to determine how web-generated cases are assigned to users or put into queues. If you do not set an active assignment rule, all web-generated cases are assigned to the default owner you specify in the Support Settings.
Next, you’re ready to set up Web-to-Case.

  • Salesforce doesn’t support rich text area (RTA) fields on Web-to-Case forms. If you use RTA fields on your forms, any information entered in them is saved as plain text when the case is created.


Sandbox


  1. Added Case Origin - "Web-form"
  2. Default Case Origin is web-form
  3. Used 'Default Response Template' - SUPPORT:  Web-to-Case email response (SAMPLE)


Generated Web  -   

<!--  ----------------------------------------------------------------------  -->
<!--  NOTE: Please add the following <META> element to your page <HEAD>.      -->
<!--  If necessary, please modify the charset parameter to specify the        -->
<!--  character set of your HTML page.                                        -->
<!--  ----------------------------------------------------------------------  -->

<META HTTP-EQUIV="Content-type" CONTENT="text/html; charset=UTF-8">

<!--  ----------------------------------------------------------------------  -->
<!--  NOTE: Please add the following <FORM> element to your page.             -->
<!--  ----------------------------------------------------------------------  -->

<form action="https://cs41.salesforce.com/servlet/servlet.WebToCase?encoding=UTF-8" method="POST">

<input type=hidden name="orgid" value="00D550000006gvD">
<input type=hidden name="retURL" value="http://">

<!--  ----------------------------------------------------------------------  -->
<!--  NOTE: These fields are optional debugging elements. Please uncomment    -->
<!--  these lines if you wish to test in debug mode.                          -->
<!--  <input type="hidden" name="debug" value=1>                              -->
<!--  <input type="hidden" name="debugEmail"                                  -->
<!--  value="luke.higgins@confirmation.com">                                  -->
<!--  ----------------------------------------------------------------------  -->

<label for="name">Contact Name</label><input  id="name" maxlength="80" name="name" size="20" type="text" /><br>

<label for="email">Email</label><input  id="email" maxlength="80" name="email" size="20" type="text" /><br>

<label for="subject">Subject</label><input  id="subject" maxlength="80" name="subject" size="20" type="text" /><br>

<label for="description">Description</label><textarea name="description"></textarea><br>

<input type="submit" name="submit">

</form>

28 July 2016

27 July 2016

Partner Community Demo Setup

Create Users

In order to create Users in a Partner Community, assuming the partner community is already set up, you'll need to make sure the Partner's company exists as an account in your org.   On their account page select "Enable Partner User".  


Create Contacts associated with that account and Enable them too as Partner Users.  Once enabled you'll be taken to their user profile page.  


Create APAC Queues

For the demo, the partner managers want to see multiple queue with assignment based on what country the email is coming from.  I don't have the domain filters yet, where emails from .nz will go to the New Zealand queue, but I do have contacts associated with accounts in the different countries.  When emails come in from those contacts, based on the account billing country they'll get assigned to the correct queue. 


Assign Reps to View Queue and List View

I've added members of the partner account to the queues.  Everyone is in all the queues for now except Edwina.  She's only in the HK queue. 

Example: 


Create Contact's Emails to Match Country Accounts

Used a bunch of gmail accounts and assigned those emails as contacts to accounts in the different countries. 
My fake email will go to the AU queue, for instance. 


20 July 2016

Project Overview - Email to Case rollout


Set Up Customer Support


business hours


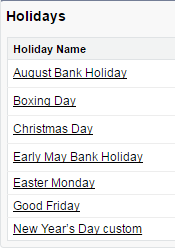
holidays


queues


Created a new Role - Validation Team

To make it easier to add reps to the queue I'm splitting up the support team as they actually are.  Half are support reps.  Half are Validation reps.  
Updated Sharing setting to account for this role. 
Edit | Del Owner in Role, Internal and Portal Subordinates: Director of Global Sales Role: NA Customer Support Rep Read/Write Read Only Private Read/Write
Edit | Del Owner in Role and Internal Subordinates: Director of Support Role: NA Customer Support Rep Read/Write Read/Write Private Read Only


assignment rules


escalation rules


Support Settings

  1. Changed default case owner from Janette Houser to Jennifer Welty
  2. Enable Feed Tracking
    1. Page Layout for Feed-Based Cases
      1. didn't match a few items
        1. Send Email Button
        2. On-Demand Email (yet)
  3. review settings
  4. Updated all of the list views so only the queue members can see the cases in the queue 
  5. Customizing the 'Custom Console Components' in the page layout.
  6. Re-Open a closed case when an email is received
    1. Why can't I create a new email trigger in production?!    
      1. Answer: 
      2. You cannot create or edit Apex classes or triggers in a production organization (unless it's a free trial).    To use Apex classes or triggers in a production organization, you need to write them in a Sandbox or free Developer Edition organization--along with the required automated tests to meet or exceed code coverage requirements--and then use one of our deployment tools (the Force.com IDE or the Force.com Migration Tool for Ant) to push your classes and triggers to production.   The reason for this is that all Apex code must be covered by automated tests in order to be deployed to production.   If you tried to write a trigger in production, you wouldn't have a test so it wouldn't save.   If you tried to write the test first, the test would fail because your trigger wasn't working, so you couldn't save that either.  So instead, you do all of your development work in a non-production organization, where these rules are not enforced, and then you can deploy your code and tests to your production organization to make their functionality available to end users.
      3. While validating the inbound change set it errors out.  I'm posting to the community.  
        1. That's pretty incredible.  Stephanie Dodson basically walked me through the whole change set deployment.   I needed to:
        2. turn off the validation rule for first name on contact records
        3. create an apex class to test the apex trigger then run it in the dev. console
        4. add both the class the trigger to the outbound change set in the sandbox. 
        5. inbound validate and deploy to production
  7. Notify Reps when customer responds to case. - created the two workflow rules in production
    1. mark New Email field when customer email
    2. unmark New Email when rep replies
  8. Set One 'From' address for reps to choose from.
  9. Omni-Channel
  10. Set up email templates such that the customer support signature, subject line and email body are defaulted.
    1. created the default email template and 3 templates i've received so far. 
  11. Service Cloud
    1. Enable On-Demand E2C
    2. Define and Verify Routing Addresses
      1. Created global action to Send Email and make it part of the feed on the Case page.
  12. Email address from Case not updating the Contact record. Here's the fix. - can't create this until email-to-case is enabled
*Bold font mean complete in production org.